Quantcast
Blog - Page 126 of 128 - Imperfect Homemaker

The Anti-Procrastination Challenge


I have challenged myself, not to a day, a week, or even a month; but to a full year of Anti-Procrastination!

I'd love to have you join me!

We are going to complete one task every day that would normally be put off until all of the “regular cleaning” is done.    If you go here, you can see all the challenges I've posted so far.

Be sure to subscribe to email updates or follow me on Facebook so you won't miss any of the challenges! 

The Great Chicken Debate: Which is Cheaper?

Have you ever felt like it will be so much cheaper to buy the bone-in chicken because it costs so much less per pound?  I know I have, but as I sit there de-boning it I always wonder if it's really worth it or whether I should be buying boneless, skinless breasts.

The other night, I decided to figure this out once and for all. [Side note: I normally try to wait until boneless, skinless chicken breasts are $1.99 or less per pound.  For bone-in chicken I try to buy it at $.99 per pound or less.] 

I had purchased 6 pounds of bone-in chicken breasts at $.99 per pound for a total of $5.94.  After I de-boned it I weighed the meat and had only 3 pounds of meat.  I could have purchased 3 pounds of boneless, skinless chicken breasts at $1.99 a pound for $5.97.  I saved a whopping 3 cents by doing all that work de-boning the chicken!

So, is bone-in chicken cheaper?  No!  I will be saving myself the trouble from here on out. 

Note: sometimes I get whole chickens or chicken thighs at $.59 or even $.49 per pound.  In that case, I would still buy the bone-in chicken.  It comes out better price-wise, plus I enjoy the taste of dark-meat and  homemade chicken broth for making soup. 

Anti-Procrastination Check-Up: Week One

Okay, I have successfully completed my first week of anti-procrastination!  Here's how it went:

Sunday: This one is really embarrassing, and revealed just how bad of a procrastinator I really am.  I threw away a half-eaten candy bar that had been sitting on a shelf for 3 days.  Yes, THREE DAYS.  There was no reason to save it because it belonged to my father-in-law who doesn't even live here – he was just stopping by and forgot to take his Twix bar with him.  Anyway, after 3 days I finally decided to throw it away.
 
Monday: Worked to get the crayon out of a load of clothes.  Fun stuff. 

Tuesday: Got some venison ground up that had been sitting in the fridge since hubby shot it.  I also went ahead and cooked all of it to make meal prep easier later on.

Wednesday: Got the rest of the venison portioned up, packaged and put into the freezer.

Thursday:  Cleaned off a tray that had been collecting papers, receipts, etc.

Friday: Bleached the dishes that had contained the raw venison.

 Saturday:  I know I did something here, but I didn't write it down, so I don't remember.  We did have a lot of fun playing outside most of the day in our wonderful 60+ degree January weather. 

How did you do last week?  I'm feeling rather unmotivated today, but I have at least started on my anti-procrastination task for today.  I guess I should get off the computer and finish…

How to Grind Venison in the Food Processor

My husband got two deer this year, his first since we've been married.  That means I got my first experience at helping butcher.  Not exactly what I would call fun, but I'm thankful for the meat.  There are, of course, certain portions of the meat which are only suitable for grinding.  When I was growing up, my dad always had a big meat grinder that he would use.  Since I did not have one, I thought I would just try it in the food processor.  It works!  Quite well, I might add.

After a little trial and error, here is how it worked best:

  • Use the S-shaped steel blade.
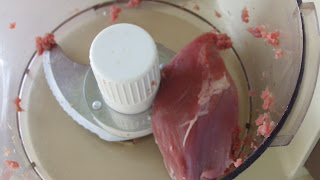
  • Only grind a small amount at a time.  Turn the food processor on the highest setting, but be ready to turn it off quickly if the meat is too tough.  If it seems like the machine is struggling, turn it off right away, otherwise you will burn up your motor.  If you are having trouble getting your machine to cut through the meat, you will have to work at cutting away some of the sinew.  See all the white streaks in that piece of meat?  That's what you have to get rid of.  I found that it was actually easier to grind the meat first, and then pick out the white strands, but every once in a while there is some that is too tough and it has to be cut off before you can grind it.
  • It took about 10 seconds to fully grind each small piece.  Bigger pieces took more like 30 seconds.

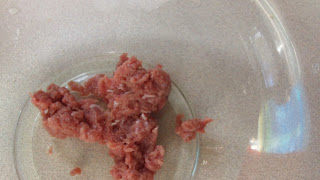
This is a piece that has already been ground.  Now you need to pick out as much of those white streaks as you reasonably can without spending forever or wasting too much meat.  I wore disposable gloves for this part.

It will look like it has been crushed to smitherines, but once you cook it, it is the perfect consistency.  See?

Now you can use it for spaghetti, chili, or anything else for which you would use regular burger!

I apologize if that was a little gross for you, but I hope it will help someone like me who had no earthly idea how to go about grinding venison.

How to Remove Crayon from Clothing

Preschool Boy + Pockets + Crayons + Washer + Dryer =

Yes, that is one of my daughter's good dresses that is absolutely covered in yellow crayon.  I washed and dried an entire load of kids clothes with a yellow crayon.  Every article of clothing had lovely yellow splotches on it.  Rather than cry, I did a little searching until I came up with what I thought should be the least pain-free way of removing said yellow crayon splotches.
In case you ever find yourself in the same predicament, here are step-by-step instructions for removing crayon from clothing.
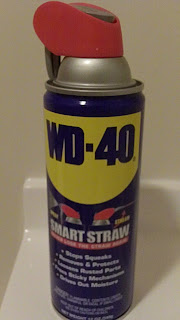
  1.  Spray each crayon splotch with WD-40.

2. After you have sprayed the spots, place the clothing into the bathtub with the hottest water you can get.  (It is very important to have your water very hot or you will end up with grease spots on the clothes.)

3.  Let the clothing sit for a few minutes and scrape each spot with your fingernail.  The crayon should come right off, along with some oil from the WD-40.

4. If you have tough spots, re-spray them and scrub them some more with your fingernail.  When you have removed all or most of the spots, put the clothes into the washing machine on the hottest water setting.  Use good laundry detergent like Tide if you can.

5.  You may have to send the load through a couple times and use some good-smelling fabric softener to get rid of the oily smell from the WD-40.

6.  Do not dry any of the clothes until you are sure the crayon marks are gone.  If you have any clothing that still has crayon marks, start over at step 1 and repeat until the crayon marks are gone.

7. NEVER wash a little boy's clothes in the future without checking the pockets!

2012: One Year of Anti-Procrastination

Look out 2012! I am challenging myself, not to a day, a week, or even a month; but to a full year of Anti-Procrastination!

I'd love to have you join me!

Let me explain what I mean by Anti-Procrastination. You know those crumbs you see when you open the silverware drawer? The messy closet that needs a good straightening? That pair of pants that needs mending? Anything that bugs you every time you see it but that you just never “get around to” is a candidate for an Anti-Procrastination project.

I really don't know why I procrastinate. I have million excuses that all seem valid, but really most of the time they aren't. “I'm in the middle of making dinner.” “We're getting ready to go out the door.” On and on I could go with the excuses, but they're getting a kick out the door this year. When I see something that needs doing, I'm going to do it right then and there!

I'm not saying that I plan to start deep cleaning the oven 5 minutes before it's time to go out the door. But those crumbs in the silverware drawer? Ten seconds and they'll be gone!

Here are my self-imposed rules for Anti-Procrastination Year. You can make up your own rules for how they will best suit your situation.

  1. I must do one thing every day of the entire year. On busy days I can choose a 10 second task like pulling that sock out from under the bed. On slower days I can plan ahead to do something that takes a little longer such as a craft project, deep cleaning, or organizing.
  2. If I start something that takes longer than one day, I must work on the same thing every day until it is completed.
  3. No task should ever take long enough to cause me to forgo my regular housework, cooking, mommy time with the kids, etc. If a task is taking too long it must be continued the next day.
  4. An Anti-Procrastination task is any task above and beyond my normal housework schedule. It can consist of cleaning, crafts, decorating, or anything else that I want. It can be something that really needs to be done or just something fun that I've been putting off until just the right time.

I'm sure I'll think of more rules as I get into this. I've already been trying to do one thing every day even though it's not 2012 yet (I decided not to procrastinate starting on Anti-Procrastination Year!). So far I've changed out my fall wreaths for the Christmas wreaths, pulled a sock out from behind the bed, and got rid of a pair of shoes.

I plan to post an update once a week of what I've been able to accomplish. I'm taking the plunge and publishing this so that I will be forced to be accountable for the entire year.

Please cheer me on, and join me in the challenge if you're up to it!