
Bible Time Suggestions for Toddlers and Preschoolers
The Lord has impressed upon me the need to be pouring Scripture into my children while they are young. One tool that I have used to accomplish this is a daily Bible Time. I struggled at first to know what to do with my young children since they don’t understand a lot of Bible terms, and they get the “wiggles” pretty quickly. Through suggestions of godly older ladies, and some trial & error, I have put together three elements to make Bible Time fun and successful.
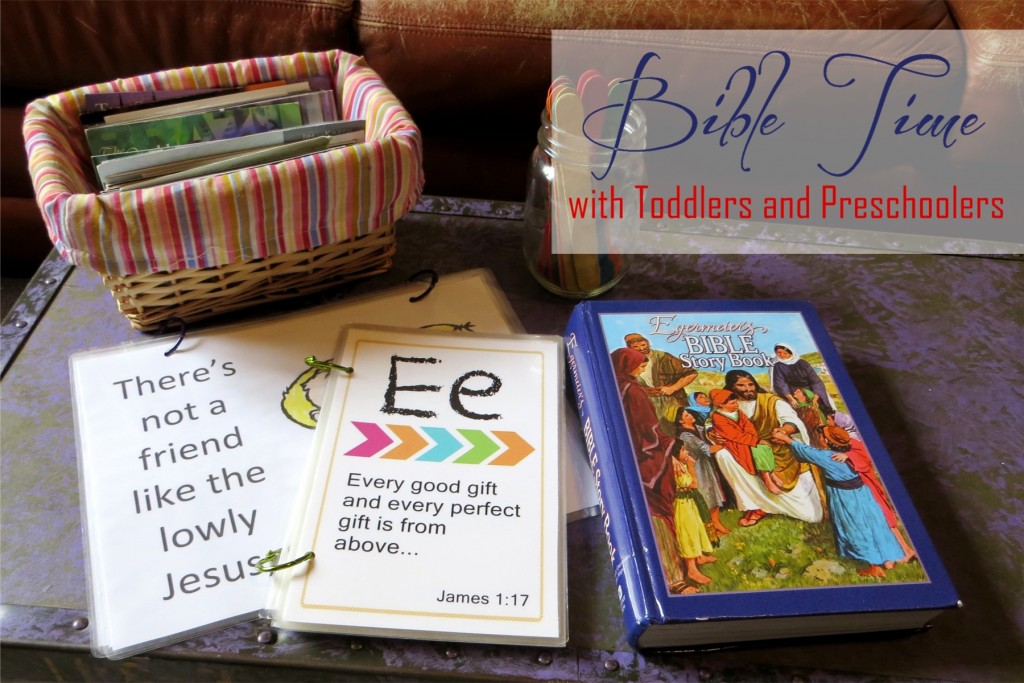
I have four children ages four and under, so our Bible Time isn’t always daily, though that is the goal. And it usually isn’t at the same time every day, because we have to flex our schedule around the ever changing needs & schedules of twin babies. To accommodate this, I put my Bible Time items together in a basket near the couch so that it is always easily accessible whenever we have a few minutes to sit down together to read, sing, and pray.
Just as in a corporate worship service, I believe that the key ingredients of devotions or Bible Time with our children are reading God’s Word, praising God through song, and bringing our requests to God through prayer.
Reading God’s Word
Be careful in selecting a children’s Bible. Many have quite diluted the Word of God. Others have introduced many inaccuracies or changed God’s Word in order to make it “child friendly.” The Egermeier's Bible Story Book was suggested to me, and we love it! It goes through the Bible in order, but divides the stories/chapters into kid-friendly portions. Though written in story form, it follows the Scripture carefully and closely. And the pictures are very beautiful!
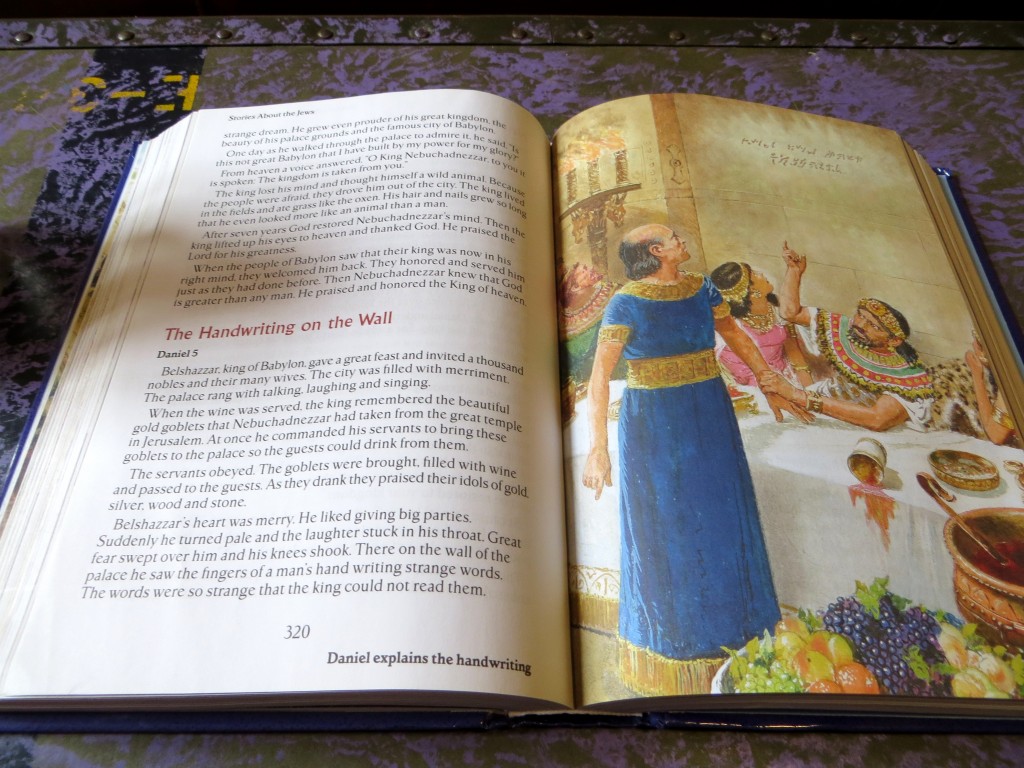
Right now we are reading through it in order from Genesis, but we have also picked stories to correlate with a “letter of the week”. (Lazarus, Lot, and Salt & Light for the letter L are some examples). I read one section to the children. Often they are riveted and ask me to continue reading, but sometimes they are squirmy and so we end with just one story.
Singing
My children love to sing! And though they have favorite songs, they are eager to learn new ones also. I have been trying to introduce them to a couple of new songs per month. I often visualize the songs by printing the lyrics and adding clipart in Microsoft Word. Sometimes I print out the words and we color the pictures together for a craft project. (I like to laminate them to make them more durable). Even though my kids can’t read yet, the pictures help them follow along as they learn the song. We also sprinkle in some songs that have hand motions, which is very helpful if they kids are squirmy.
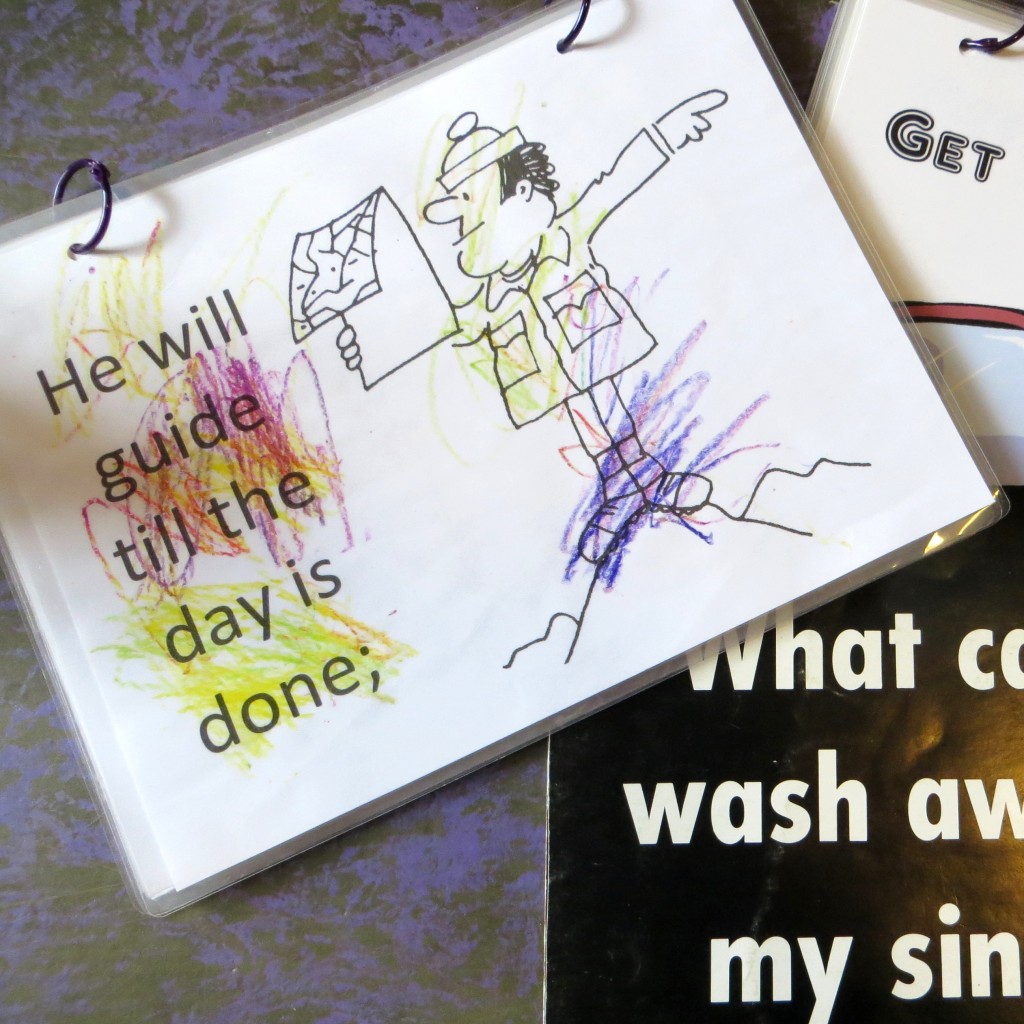
My kids get a good dose of children’s Bible songs at church. We sing their favorites and teach them new ones too. I also want them to learn the good old hymns, which are so rich in doctrine and Scripture. We take it slow when learning these new songs to be sure they understand. After we sing the song, I discuss the words and the meaning with them. Through this repetition they come to understand what the song means.
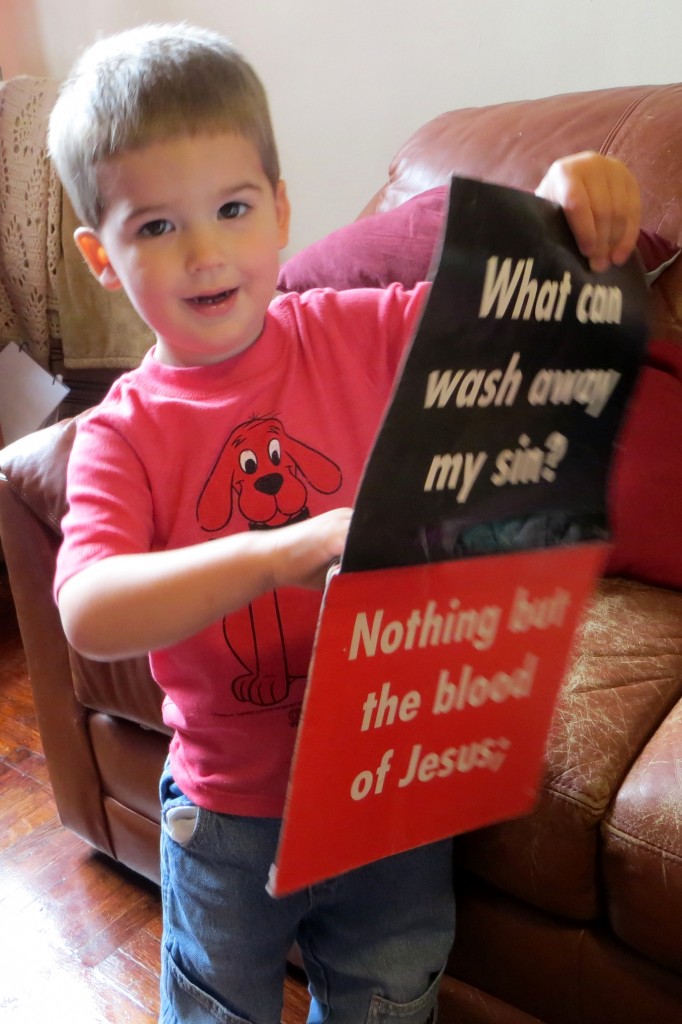
For example, Nolan loves to sing “Nothing but the Blood of Jesus.” Our visual folds out into the shape of a cross. After we sing I ask them questions like, “What shape is this?” “Why is it a cross?” “Why did Jesus have to die on the cross?” “What is the only way we can be clean from our sins?” “What is sin?”
Prayer
We have three different approaches to praying with our kids. We mix them up based on the time and their attention span that day. Sometimes I ask them to share one blessing and one prayer request, and then we pray for those things.
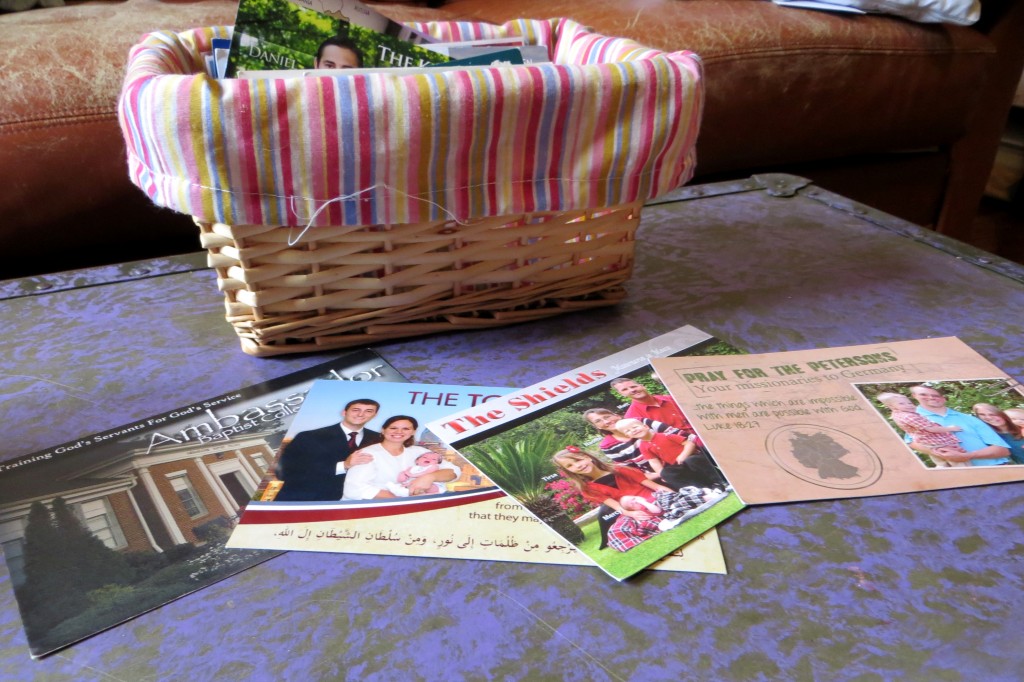
Another way to guide prayer time is to pray for missionaries. We have a basket of prayer cards, and my kids love to pick out a card and pray for that missionary. This teaches them to be concerned with the needs of people around the world. It also helps them put a face to people we are praying for regularly. When a missionary was badly burned in an accident, we showed the kids his picture to help them make associations as we prayed for his recovery. And they each have a favorite card they dig through the basket to find!
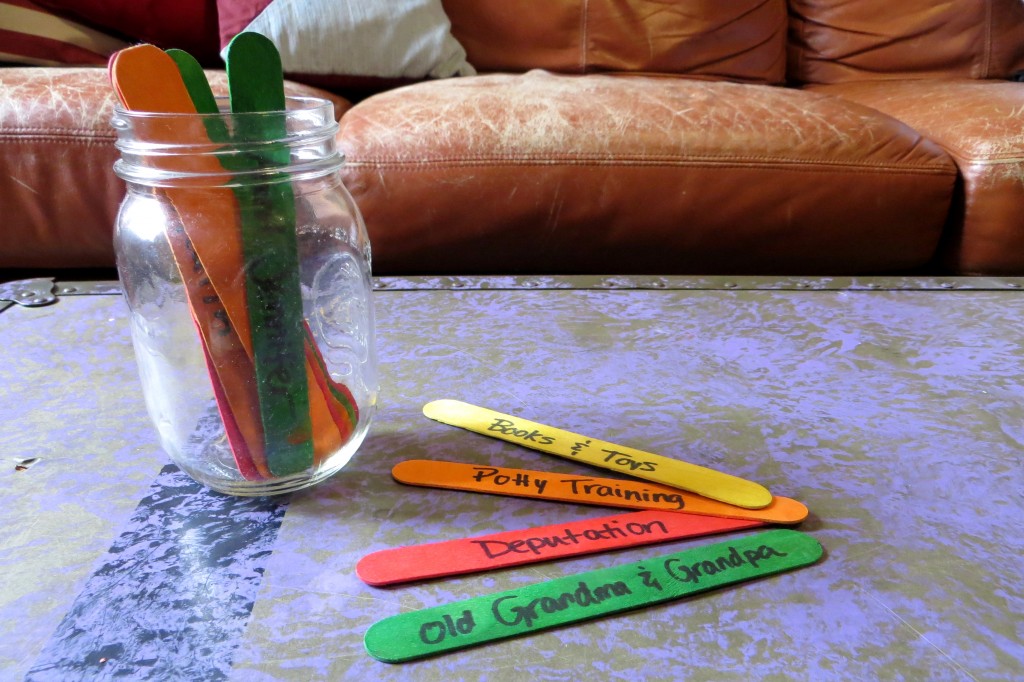
The last tool we use is a jar of “prayer sticks.” We wrote blessings and special people on popsicle sticks. We let the kids pick a couple of sticks out at prayer time, and that is the blessing/request for which they are to pray. Some examples are people with chronic illness, family members (we have all of our grandparents on sticks), and people in need of salvation. Some examples of blessing are friends, books & toys, health, etc.
Do you have a daily Bible Time with your children? So often they are a thirsty sponge, absorbing everything they encounter. It’s important, and a great opportunity, to “fill them up” with the things of God! What have you found to be the best way to have a devotional time with young children?
Crockpot White Chicken Chili
The following post is from guest contributor Andrea.
 I love cooking in the winter. I can cook and bake to my heart’s content without overheating the house. And I can make soup – a lot. We eat a lot of soups in the winter months. They are usually frugal to prepare. They are very filling and healthy. And most soup recipes make a lot, which means that I can cook once and get several meals out of the effort. I especially love soups that can be tossed into the crock-pot in the morning and then ladled into bowls at dinner time. One of my family’s favorite “soup” recipes is White Chicken chili. I first heard of this recipe from my friend Sarah. I have tweaked it a little until it is just the way my family loves it. It’s frugal, hearty, easy, and it makes a whole lot. I hope you enjoy it as much as we do!
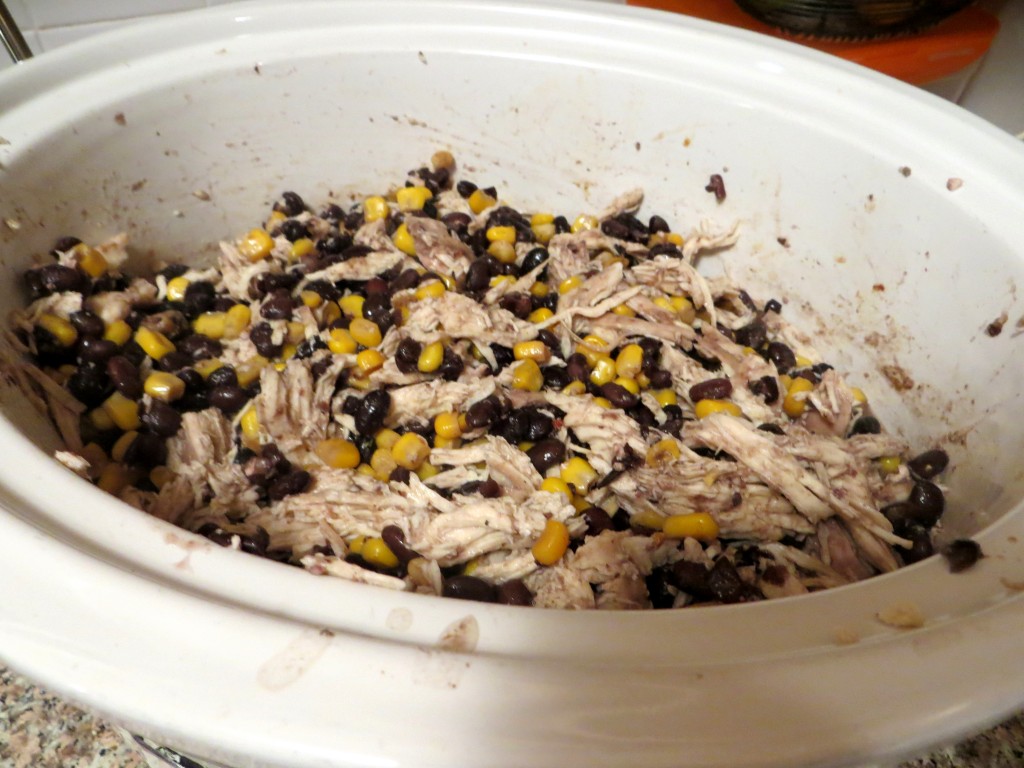
This isn’t a true white chili because it calls for black beans instead of white beans. You can choose to use canned ingredients and a store-bought spice mix to make it really fast, or prep the ingredients yourself. I prefer to cook dry beans. I cook up a whole bag and then freeze it in 2-cup portions. For this recipe I use two of my pre-portioned bags. You can buy a white chicken chili seasoning packet, or just mix up some spices at home (for much less money!).
White Chicken Chili
2 cans of corn (or about 4 cups of frozen corn) (do not drain)
4 cups cooked black beans (if using canned beans, do not drain. If using cooked dry beans, add about ¼-1/3 cup water)
2 chicken breasts
1 tsp. garlic powder
Sprinkle crushed red peppers
1 tsp. cumin
½ tsp. oregano
Pinch cayenne
Combine first three ingredients in crockpot. I often throw the chicken in straight from the freezer, but you can thaw it first. Combine spices and sprinkle over the top. Cook on low 6-8 hours. Before serving, remove chicken from crockpot and shred with two forks. Return chicken to crockpot and mix to blend all seasonings. Serve over rice or tortilla chips, with a dollop of sour cream and shredded cheddar cheese! (My husband likes his with a big helping of Tabasco sauce too).


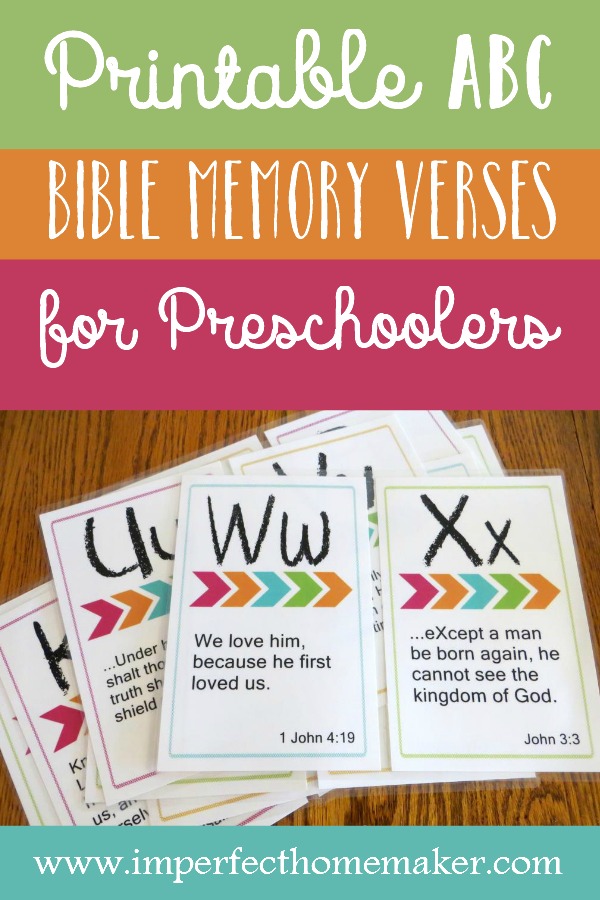
Printable ABC Memory Verses for Preschoolers (KJV)
These printable ABC memory verses were created by my contributor Andrea. I'm so glad she made these for us!
Recently I discovered that my daughter is ready for some harder Bible memory verses than “Be ye kind” and “God is love.” She was attending Summer Adventure Club at a friend's church, and she would get a prize if she could learn her verse for the next day. The verse was Romans 6:23 – “For the wages of sin is death; but the gift of God is eternal life through Jesus Christ our Lord.” We worked very hard, and sure enough – she was able to say her verse and get the prize! I was very proud of her effort.
A few days later, I overheard her talking to herself in the car, and all of the sudden out came Romans 6:23. Word perfect. She rattled off the whole verse, and we hadn't even reviewed it for several days! She then quoted it to our pastor, and her Sunday School teacher at church. Now I knew that I needed to add some new verses to her memory book.
We will be doing a form of preschool this year, and working on alphabet and phonics. I had seen some printable ABC memory verses on Pinterest, but they were not in the King James Version of the Bible. So I decided to create my own! These memory verse cards were designed to reinforce the alphabet, learn the phonics sound of each letter, and incorporate Bible memorization at the same time. I created them for my daughter who is almost four. I tried to use entire verses as much as possible. A few of them are a little longer, but most are still short and easy. All verses come from the King James Version.
When children are young, they can learn and absorb information so quickly. This is the perfect time to pour God's Word into their hearts and lives. Many of the verses that I can easily spit out without thinking are the ones I learned as a child. I want my children to know and understand God's Word so that they can say with Timothy, “And that from a child thou hast known the holy scriptures, which are able to make thee wise unto salvation through faith which is in Christ Jesus” (2 Timothy 3:15). I tried to select verses that could be easily explained, and that would be applicable to their young lives right now.
The printable verse cards are two verses per sheet. I printed them onto card stock for more durability. I then cut each sheet in half, and laminated them. (I use this laminator and these laminating pouches to save money). After punching holes, I used binder rings to fashion a small book.
Thanks so much for subscribing! Check your email for download instructions. (Be sure to check your spam box if you don't see it.
I hope they are a blessing as you use this as a tool to infuse God's Word into your little one!

Accepting Grace In This Season
The following is a post from one of Imperfect Homemaker's contributors, Andrea.

“To every thing there is a season, and a time to every purpose under the heaven…”
Ecclesiastes 3:1
On October 4, 2012 I went to the doctor to confirm my third pregnancy. Little did I know that when I left the office that day, I would enter a new season of life. You see, the doctor informed me that I was not only expecting our third child, but also our fourth…I was having twins! With this news came the realization that we needed to find a new apartment so that I wouldn’t be climbing three flights of stairs, my husband needed a new job making more money, and we needed a new vehicle that could hold four car seats. Life with four children ages three and under was definitely a season of life that I didn’t anticipate ever walking through!
Our twins, Liberty & Nehemiah, were born in April. During my pregnancy and the last six weeks the Lord has taught me several lessons about the seasons of life. Perhaps you are embarking on a new season of life as well. I want to let you know that God has enough grace for this new time, and to encourage you to give yourself grace as well
Be Flexible.
As a “type A” person, I really like to know what is coming. I like to be able to plan, and to be prepared. But I have learned am still learning that things will not always stay the same; they will not always be predictable. When an unexpected situation or life change happens, we can expect and accept the grace of God. He has promised that we can come boldly to His throne and beg that grace, even when things seem to be in upheaval.
Re-align Priorities.
The revelation that I was having twins forced me to re-align my priorities. I had to be more careful in my pregnancy, and get more rest than I was used to allowing myself. This meant fewer outings and activities, and saying “no” to some things that I really wanted to do or be involved in. Now that my babies are here, I am trying to focus on my children each day and not the messes developing in my house. I like everything to be clean, organized, and put away. That doesn’t always happen anymore! Last week I mopped my bathroom floor for the first time in {gasp!} over two months!I have to realize that this season won’t last forever. My children will only be little once. “Tomorrow” I will wake up and realize that they have grown up too fast. I know I will regret it to look back one day and know that I missed their childhood but I always had a spotless house.
Accept Help.
This has been a hard one for me! Maybe it’s a little bit of being a woman, a little bit of that “type A” personality, and surely a lot of pride that makes me think I can do it all, all by myself. During my pregnancy I couldn’t bend over the sink to wash my dishes. I felt terrible having my husband come home from a long day of work and wash all the dishes for me, but I had to learn to accept his help (which was lovingly offered) .I am blessed to have a teen from our church as a mother’s helper one day a week for the summer. It is very humbling to have someone else dust your house and mop your floors. But as I graciously accept the help offered, I have found freedom from my “do it all” mentality.The body of Christ also comes into play here. My sisters in the Lord have been more than helpful to me during this season. There is always an unexpected meal, offers for child care, and even two ladies who are washing all of my laundry for me. It has been a blessing to know that I am not in this alone, and also challenging to me to be more sensitive and helpful to others during times of need.
Give Yourself Grace.
If God is willing to give us His all-sufficient grace for every season that we encounter, shouldn’t we be willing to give ourselves a little bit of grace too? In the past I have been an avid couponer. I have rarely had paper towels, paper plates, or other disposable items in my house. I have made my own laundry detergent and sewed many of my children’s clothes. I cloth diapered my first two children.But now, in a new season, with new challenges, I am learning to give myself grace. I haven’t used a coupon in a while, and I even ordered my groceries online and paid to have them delivered! We use paper plates for lunch a lot, to save me an extra load of dishes. I bought laundry detergent at the store yesterday. And underneath the bunk beds is a huge stash of disposable diapers for my three kiddos who need them. I don’t clean my floor daily, and I only scrub the toilet when I know someone is coming over (or it gets really bad). But it’s okay. It won’t be this way forever. If we have another child, I would love to cloth diaper again. When my babies are bigger I may return to cloth napkins and homemade detergent. For now, I am giving myself grace.
I hope this has been an encouragement to you, no matter what season of life you are in. Maybe you are in a position to be a helper to someone else in a difficult season of their life. Maybe you need to give yourself a little grace for right now. I would love for you to leave a comment and share your season with us!
Spring Children’s Craft: Coffee Filter Butterflies
The following is a post from our contributor, Andrea.

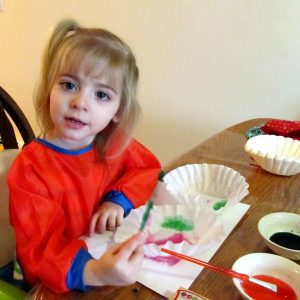
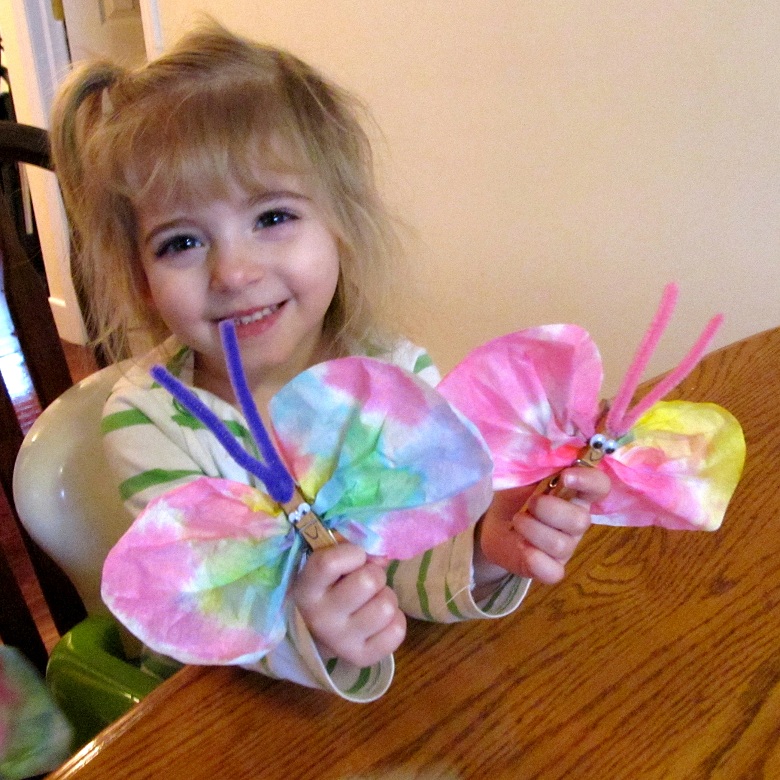
My little girl loves doing crafts. Anything that involves glitter, paint, glue, or coloring is right up her alley. Since it has been cold, and my husband takes the car to work each day, we have been “stuck” indoors with cabin fever! I've been trying to spice up our daily routine by sprinkling some crafts and new activities into the week. Recently we made a very simple craft: coffee filter butterflies. (I have an 18 month old and a 3 year old, and both were able to do this craft. I only helped with the gluing).
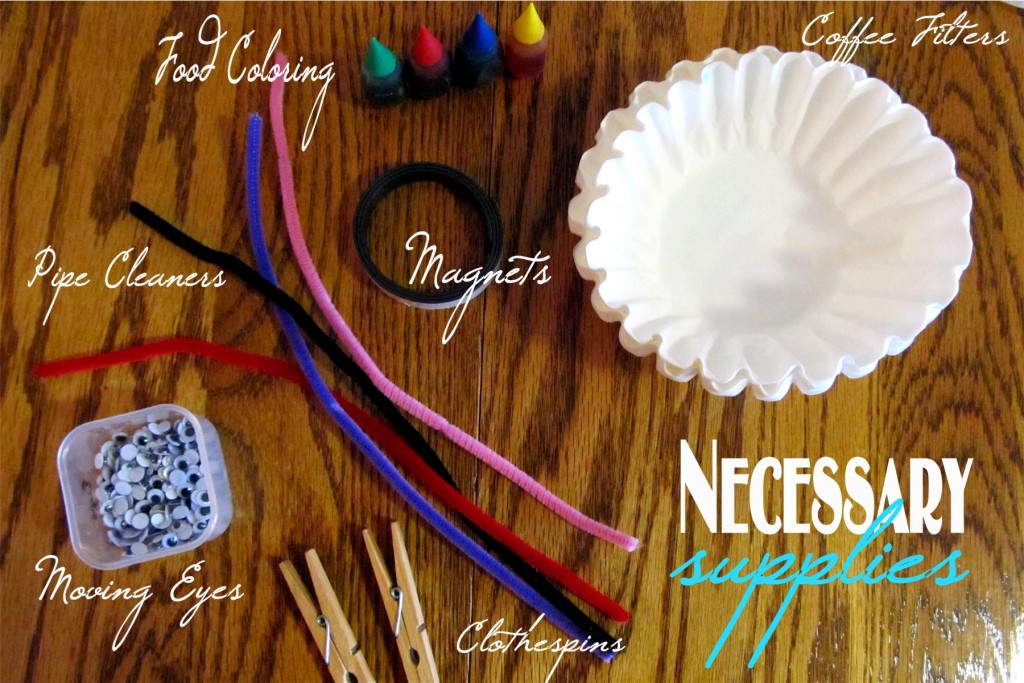
Supplies:
- Coffee filters
- Food coloring
- Small bowls or Dixie cups
- Paintbrushes
- Clothespins (one for each butterfly)
- Pipe Cleaners
- Moving eyes (optional)
- Magnets (optional)
If you have older children you can use Elmer's glue or craft glue. My kids are young and impatient, so I used a hot glue gun to put their butterflies together. If you are pressed for time, you can use a hair dryer to speed up the drying process after the filters are “painted.” We split our craft into two segments – one before lunch, and one after nap time.
Directions:
1. Prepare the area. I have a plastic table cloth I place on the table when we are crafting, and my kids wore paint smocks since we were using food coloring. I also had a box of baby wipes and a roll of paper towel handy…which my son put to good use.
2. Mix colors. In each small bowl or cup add 1 Tablespoon of water. Then add several drops of food coloring. The more food coloring, the more vibrant the color will be on your coffee filter.
3. Paint. I placed a paper towel under each coffee filter to help absorb the excess water. I flattened the coffee filter and then let my kids use the paint brushes to drop the colored water onto the filters. Then we hung the filters up to dry. {I used clothespins to clip them to a hanger over the bathtub}. Let the filters dry completely. We painted before lunch, and completed the butterflies after nap time. You can speed up the process with a hair dryer if needed.
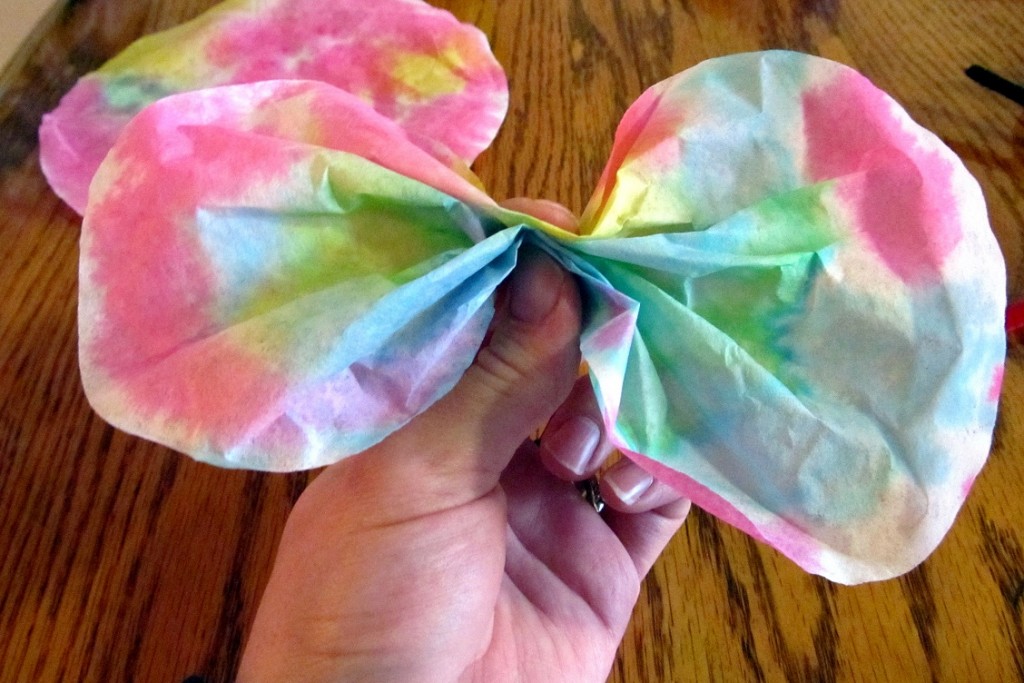
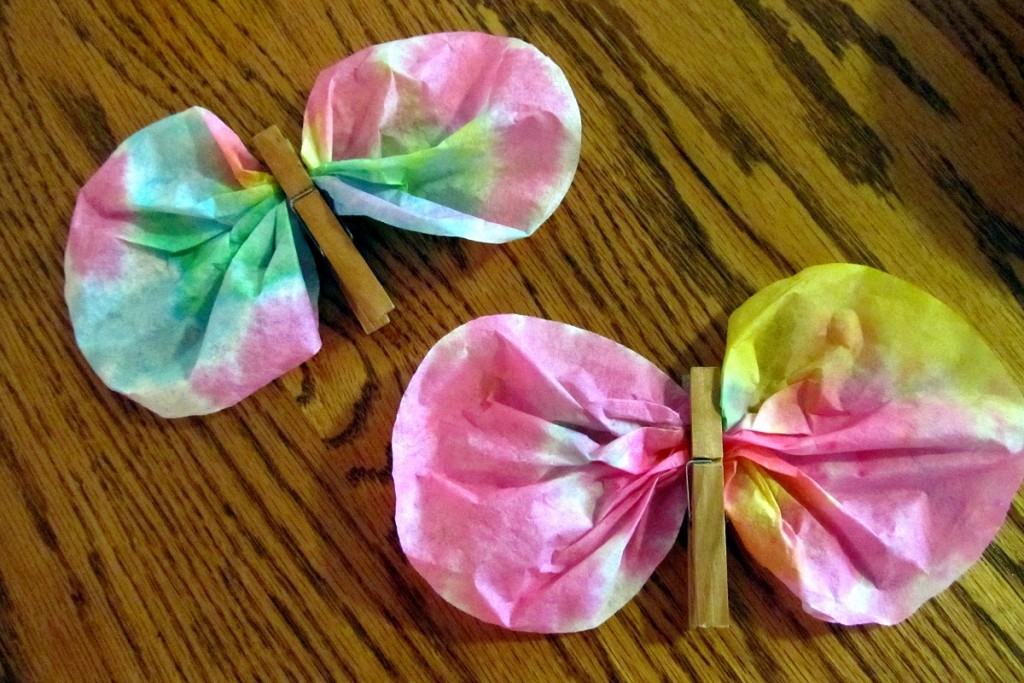
4. Assemble the butterfly. Scrunch the filter up in the center so that it will clip inside a clothespin. The clothespin is the body of the butterfly. You can have older children paint the clothespin if you want, but my kids were too little for that. I added some hot glue to keep the filter inside the clothespin, because I knew my son would try to take it apart. We cut each pipe cleaner in half, and then folded the piece into a “v” to form the antennae We glued it onto the clothespin, along with some moving eyes. My daughter insisted that the butterfly needed a mouth, so we added that detail with a Sharpie marker. Add a magnet strip to the back of your butterfly if you want them to hang on the fridge.
That's it! It's a simple craft, but my kids had fun creating a mess with the colored water, and then getting a butterfly out of it. They also like playing with magnets on the fridge while I am working in the kitchen.
Easy & Frugal Organization for Children’s Activities or Craft Supplies
I love to be organized. I like everything to have a place so I can easily find and access it when I need it. I really like all of the pretty boxes and organizing systems that you can find in the stores today. However, most of them cost a pretty penny. When you are living on a very tight budget, it’s hard to squeeze out anything extra for something aesthetic.
Last year when I wanted to re-organize my children’s closet, including the numerous art & craft supplies that we own, I really wanted everything to look pretty. But I didn’t have any extra money to spend on the project. That’s when I came up with an easy and frugal method of organizing and displaying all of the supplies in the closet.
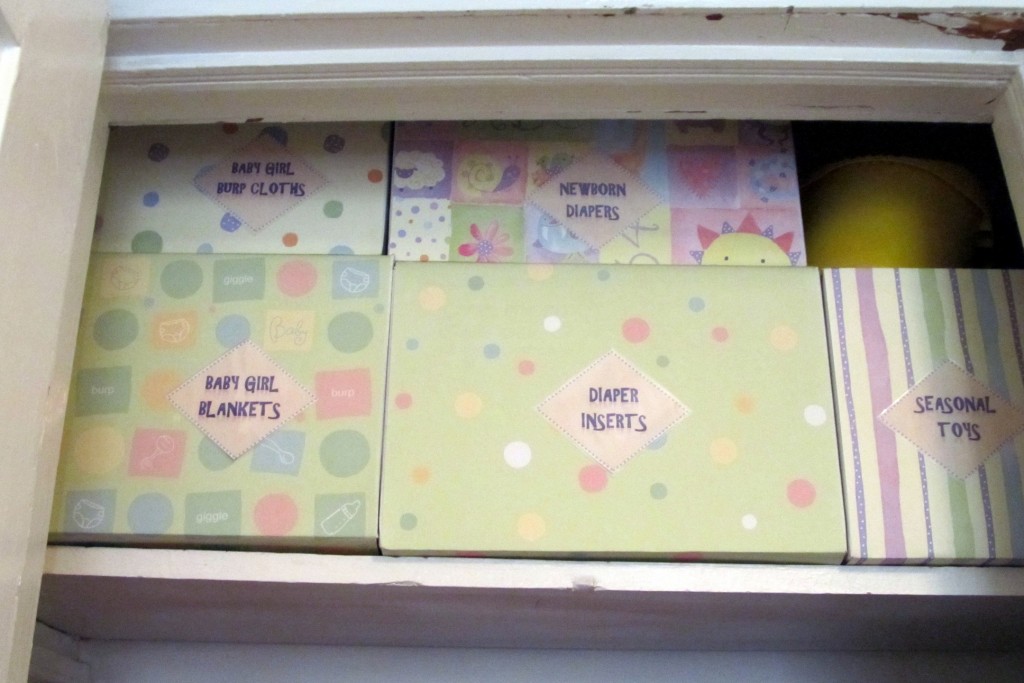
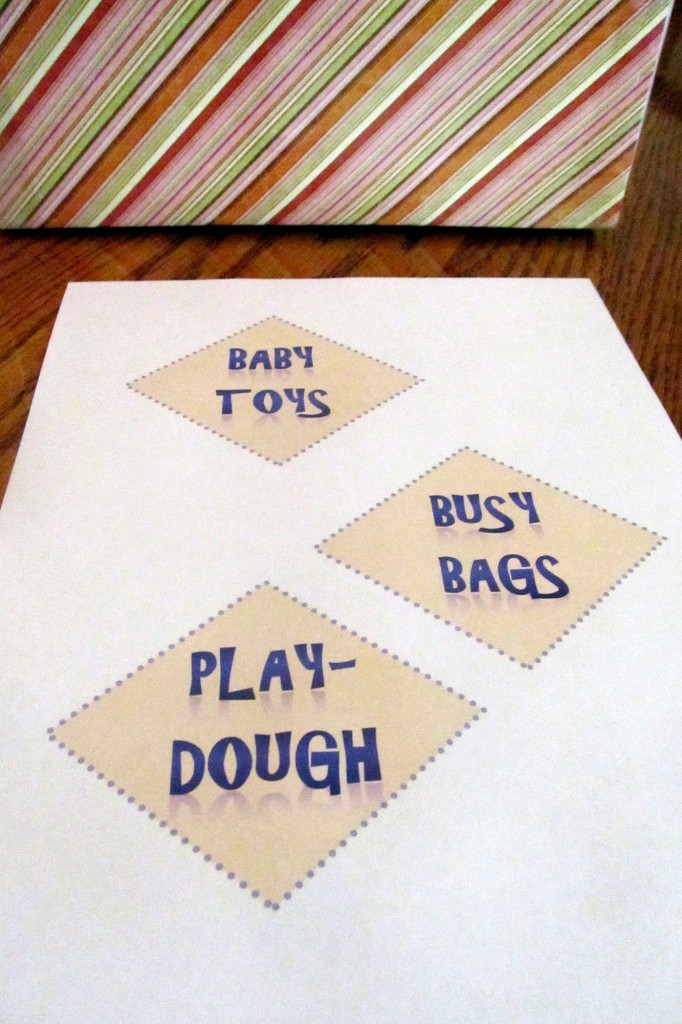
Basically, I used boxes of the same size and covered only the front of the box with scrapbooking paper. I then made matching labels for each box so that I could quickly know the contents. The boxes stacked neatly and looked nice because they were all the same size. The decorative paper made them look pretty and match the room decor. Since only the front of the box could be seen when they were stacked on the shelf, covering just one side of the box in pretty paper was quick, easy, and economical.
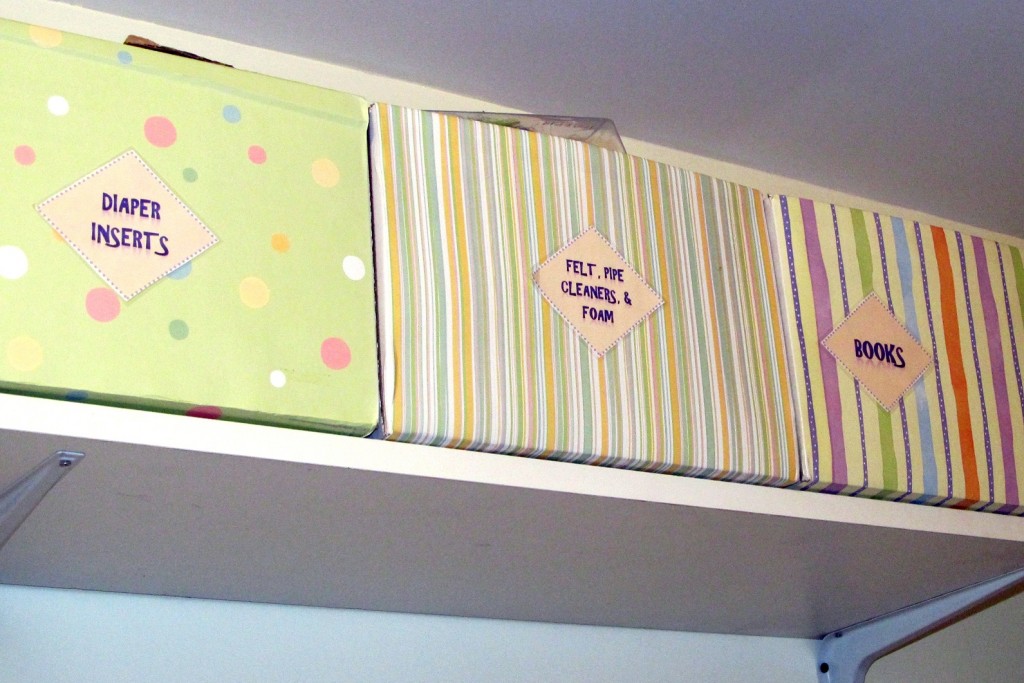
I used some boxes that were leftover from a home internet business. However, I have seen boxes for 50 cents or $1 at Lowes or Wal-Mart.
Here are the supplies you will need:
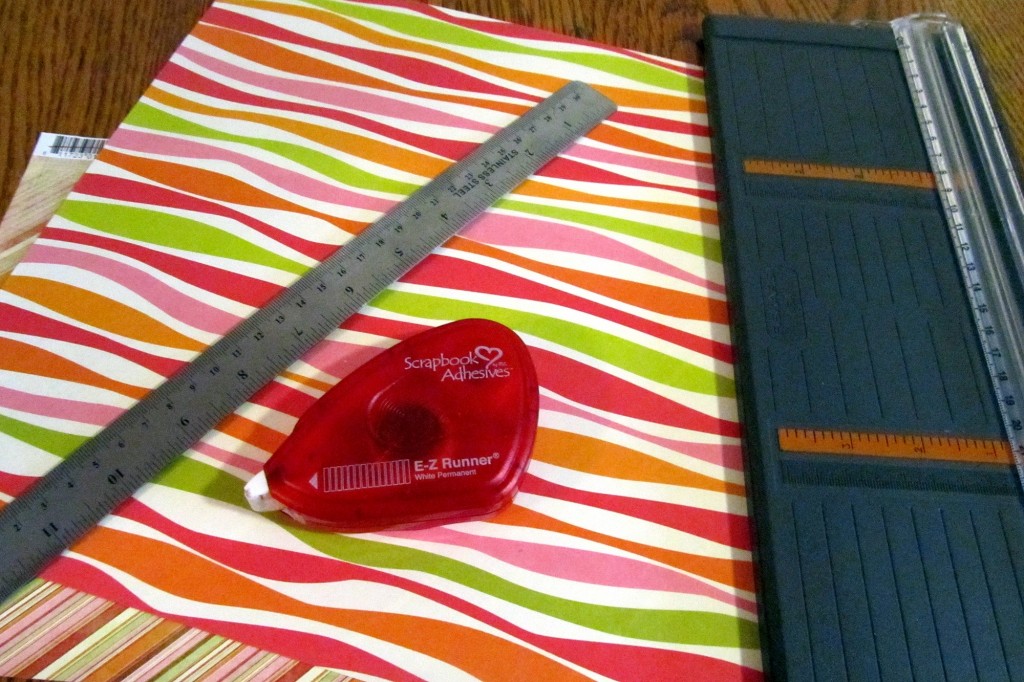
- Scrapbooking/decorative paper. You can wait for a sale or use a coupon to get these for 10-25 cents per sheet. As a paper crafter, I had a lot on hand already. The 12×12 size would be best.
- Adhesive – I used scrapbooking adhesive, but you could also use hot glue or just packaging tape
- Ruler
- Paper cutter
Instructions:
Using the ruler measure the width of your box. Cut your scrapbooking paper to the width of the box using the paper cutter. Now place the paper on the box, and fold the excess paper to overlap the flap of the box on the top, and the bottom of the box. Remove your paper and add adhesive near the fold lines and all of the edges. Place the paper back on the box, folding the ends around the box, and adhere. I sometimes add some clear tape to the edges of the box if I am planning to use it frequently. This keeps the paper edges from getting ruffled. Depending on the strength of your adhesive, you may want to tape the ends of the paper on the box flap and box bottom to ensure they stay in place.
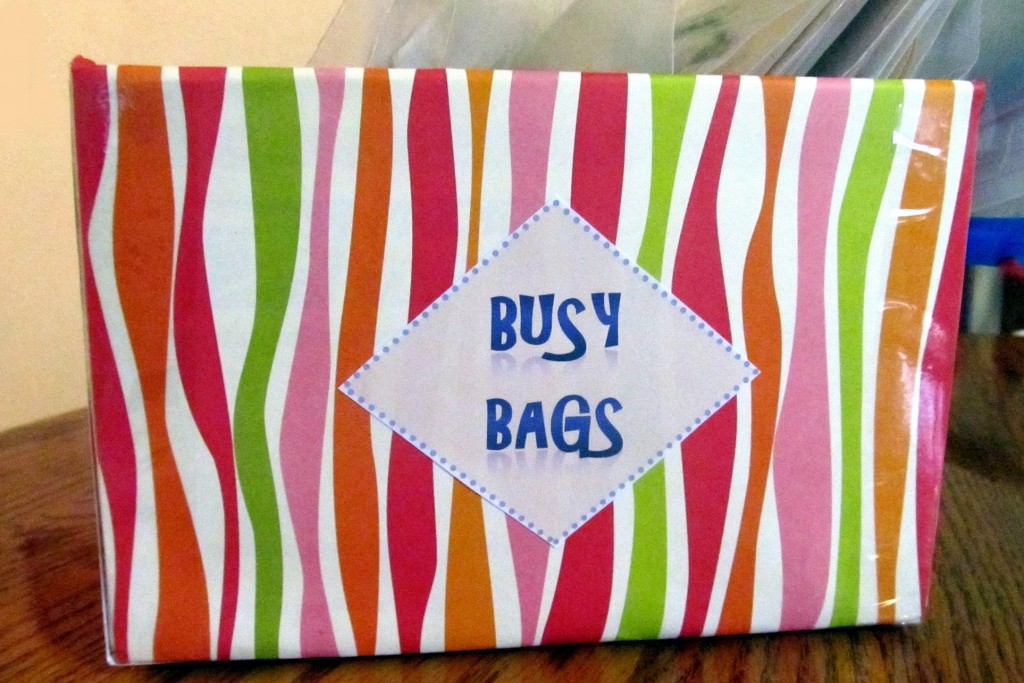
I create custom labels using this tutorial from IHeartOrganizing. I use Microsoft Word as opposed to Excel. It’s very easy to create a shape, customize the color & border, and add some word art. After printing you can laminate the label for added durability.
That’s it! You have just created visually appealing storage boxes for $1-$1.25 each (or less), as opposed to $3-5 each for plastic bins, or even more for fabric storage bins.