
Anti-Procrastination Challenge: Shiny Faucets

I saw on Pinterest forever ago that if you rub waxed paper over your faucets it will keep the faucets from getting those ugly water spots on them.

Source: inthiscrazylife-bethany.blogspot.com via MaryEllen on Pinterest
I cannot tell you how many times I have wiped down my sinks and faucets and thought, I really should try that waxed paper thing. Instead of just going and getting the waxed paper and trying, I just think it every time. Why do I procrastinate about everything?!!!
Anyway, so today I finally decided to go do it, and lo and behold, I had no waxed paper.
I tried checking the internet to see if there was anything else I could use, and I found something that said to use rubbing alcohol.
Here is my bathroom faucet immediately after cleaning it with alcohol:
(By the way, it is incredibly hard to take a good picture of a shiny faucet in a dimly lit bathroom. You'll just have to use your imagination, okay?)

Then, I purposely splashed water all over the faucet. Most of it was repelled by the alcohol and ran right off.

Here's what it looked like after it dried. I think it looks just as good as when I first cleaned it with the alcohol.

Time will tell how long I can go before I need to re-treat it with alcohol, but I can't imagine the waxed paper trick lasts forever either.
It's time for you to take your turn in this challenge! Go shiny up those faucets! If anybody tries the waxed paper method, I'd love to hear how it works for you. Or, if you have any other ingenius ideas for keeping your faucets shiny, I'd love to hear about those too!
If you’re just joining the Anti-Procrastination challenge, you may want to subscribe to email updates or follow me on Facebook to receive each new challenge!
How I Survive Mondays

Monday mornings normally dawn with my house in disarray, my eyelids heavy, and my kids grouchy. I love Sundays, but they can take a little bit of a toll on my house. My husband and I try to get up early enough to have breakfast together as a family, get ourselves and three little ones dressed for church, and leave early enough to make sure our responsibilities as Sunday School director and pianist respectively are taken care of. In our wake is normally a trail of pajamas, outfits that didn't work out, dirty breakfast dishes, and miscellaneous articles the kids got out behind our backs. We come home to a quick lunch, determined to straighten up before naptime, but end up crashing and leaving even more dishes to be done. After a short nap, we all get ready again for choir practice and evening service. After the service we usually spend time fellowshipping and/or practicing music. On our way home we often swing by the store to pick up bread or milk for the week. By the time we get home it's getting late and there are hungry mouths to feed, little clothes to change, and a mess that is still staring at me as I add yet more dishes to the pile. Any notions I may have had about cleaning up before bed are quickly fleeing as my eyelids struggle to remain open.
Monday arrives with my engine struggling to start, but I know I've got to get things under control as soon as possible.
So here's what I do.
I start in the easiest room, which is usually the bedroom. I set a timer for 5 minutes and start straightening up as fast as I can. I get the kids involved and send them on errands. “Go put this in the trash can. Hurry! Put this in the hamper. We have to get done before the timer dings!” They enjoy racing the timer, and it definitely helps me go faster too. By starting in the easiest room I get to see immediate progress which encourages me to keep at it. When the timer dings I move on to the next room. I spend five minutes in each room, and I am usually surprised to find that every room gets clean in that amount of time. The kitchen usually takes longer, but it doesn't bother me too much because the rest of the house is already clean by then!

In less than an hour my house goes from looking well nigh hopeless to completely clean! It's definitely an encouraging way to start off my week. When I try things any other way I end up discouraged and walking around in circles.
So that's how Mondays usually start at my house.
How do you survive Mondays? Do you have any tips we should know about? Please, leave a comment!
This post may be linked to one of these parties.
Blender Pancakes


Well, here it is!
Ingredients:
1 cup milk
3/4 cup whole wheat berries (purchase here)
2 teaspoons baking powder
2 tablespoons brown sugar
2 eggs
1 teaspoon salt
Directions: In a glass blender, blend milk and wheat berries for 4 minutes on high. Add baking powder, brown sugar, eggs, and salt and blend for 1 minute on low. Pour batter onto hot griddle and cook until bubbles form on the surface. Flip pancakes and cook for an additional 2 minutes or until golden brown.
Can I just say that this is great?! I loved the fact that I used only 3/4 cup of my wheat berries rather than a whole bag like I used when I made bread! The wheat berries ground up so much better when they were combined with a liquid, and the pancakes were delicious! I also loved the fact that I could just dump everything into the blender and pour the batter directly onto the griddle.
I'll definitely be making these again!
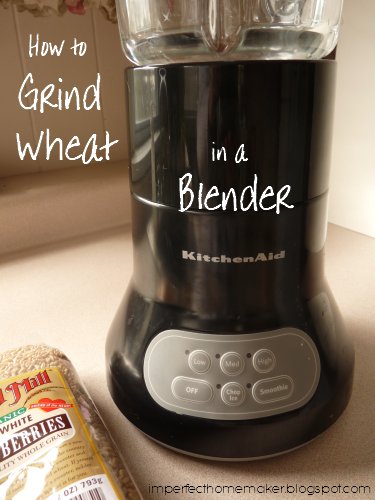
How to Grind Wheat in a Blender
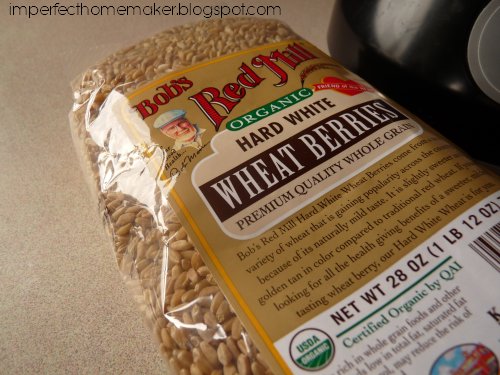
Step one: Get some wheat berries.
I used hard white wheat berries, but it shouldn't make much difference what kind you use.
Step Two: Get your blender ready to go. Do not let the brand name of my blender fool you. KitchenAid mixers are definitely 10 steps ahead of any other mixer, but their blenders? Eh…not my favorite by any means. All that to say – even if you have a cheap blender, it will probably work just fine.
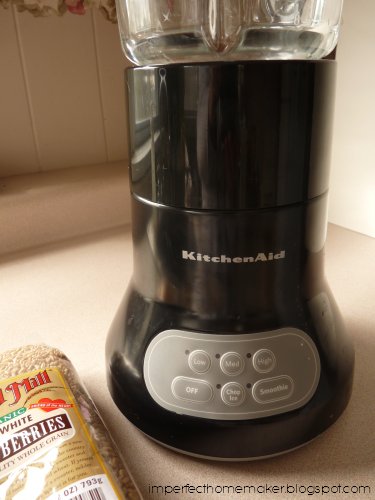
Step 3: Add the wheat berries and start grinding. I only ground about a cup at a time. The wheat berries jumped so high when I turned it on that I was afraid if I added any more the flour would start flying out the top of the blender.

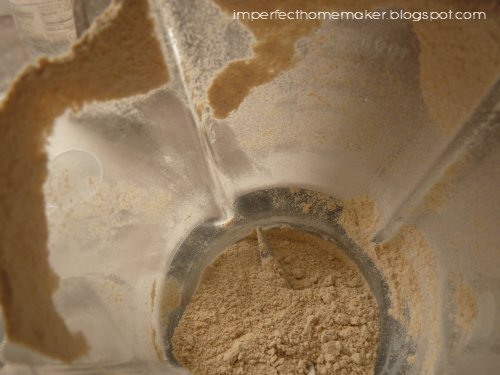
Step four: I found that I needed to let it run on high for about 2 minutes. If I ground for less time it still had chunks. And if I ground for more time, it didn't seem to get any more fine, but the motor started heating up the flour.
Step five: Bake some bread or rolls using your favorite whole wheat bread recipe. I actually made some of both. My bread didn't turn out too pretty, but you get the idea.

My conclusion: The blender definitely does not get the flour very fine. The dough feels very gritty when you're working with it. But as you can see from the pictures, it is still very useable. (How pretty your bread turns out just depends on how good of a cook you are – which I'm obviously not the greatest!)
Update: I tried making blender pancakes and was super happy with how they turned out! The wheat berries ground up even more nicely with the liquid added to the blender. Click here for the blender pancakes recipe.
The Great Chicken Debate: Which is Cheaper?

Have you ever felt like it will be so much cheaper to buy the bone-in chicken because it costs so much less per pound? I know I have, but as I sit there de-boning it I always wonder if it's really worth it or whether I should be buying boneless, skinless breasts.
The other night, I decided to figure this out once and for all. [Side note: I normally try to wait until boneless, skinless chicken breasts are $1.99 or less per pound. For bone-in chicken I try to buy it at $.99 per pound or less.]
I had purchased 6 pounds of bone-in chicken breasts at $.99 per pound for a total of $5.94. After I de-boned it I weighed the meat and had only 3 pounds of meat. I could have purchased 3 pounds of boneless, skinless chicken breasts at $1.99 a pound for $5.97. I saved a whopping 3 cents by doing all that work de-boning the chicken!
So, is bone-in chicken cheaper? No! I will be saving myself the trouble from here on out.
Note: sometimes I get whole chickens or chicken thighs at $.59 or even $.49 per pound. In that case, I would still buy the bone-in chicken. It comes out better price-wise, plus I enjoy the taste of dark-meat and homemade chicken broth for making soup.